 |
| View C is the upper-left view |
One of my absolute favorite patterns out there right now is Butterick 5390, especially view "C" which has a scoop neck with trim, and fitted sleeves with split cuffs. I've made view C once before and it was my first attempt at fitted sleeves and it turned out great. I've also made View A and it's become one of my favorite shirts to wear out.
While in Philadelphia, I picked up some lovely peachskins and I'm going to make view C again, with a royal blue body and light grey cuffs. Definitely not something I should wear while gardening, eating ribs, or cleaning the gutters. I also picked up some 2" trim that I'm going to make a go of, although it might be a little wide for a scoop-neck and not work its way around the corners very well. We'll see!
 |
| Fabric and matching thread, Contrast and matching thread, Pattern, Trim, and Interfacing. |
Cutting out:
There are three cutting layouts for this pattern:
- The shirt body
- The contrast for the cuffs
- The interfacing
One thing that's important to remember while you're cutting out the shirt is to mind your p's and q's specifically with the sleeve arms if you're not able to cut both pieces out at once on a fold and you're not using double-sided fabric. The notches on the sleeve will need to line up specifically with the notches on the front and the back pieces--this is how you make sure the sleeve will fit the right way. So if you have to cut the sleeve out twice, you will probably have to do one cut with the pattern right side up, and the other with the pattern right side down. Also, don't forget that notch that's specifically on the cutline for Sleeve C. It can be easy to miss if you're trying to keep the sleeve piece whole for later projects.
Now, the first few steps of making this shirt (interfacing, stitching the front darts, stitching front to back together at shoulder and side-seams, and putting in the collar) should all be quite familiar if you've done the first three projects.
Step 1 - Fuse interfacing to wrong side of each matching fabric section, following manufacturer's instructions.
This is fairly straightforward: you want to get your collar pieces together. We've done this twice before, so you should be getting to be old hand at it by now.
Step 2 - Stitch darts in front. Press down.
Steps 3 & 4 are for View D.
Step 5 - With right sides together, stitch Back to Front at shoulders. Stitch side seams, leaving open below large circles.
This is a plain seam. Then, it's just attach the front to the back like we did in our sleeveless tunic and sundress patterns. You should be old hat at this by now. Make sure you don't stitch the side seams all the way to the bottom edge, use a pin to remind you when to stop at the large dot.
Steps 6-10 are the standard collar interfacing that we did for the sleeveless sundress. For details on how to complete these steps, see this post.

This is a straightforward easestitch, I recommend putting the inner easestitch in at ½ and the outer easestitch in at ¼" -- this way your inner easestitch isn't along your seamline.
Note, the circles are different than the notches! The dots mark the beginning and end of your easestitch, your notches will be used to match the sleeve to the armholes of the shirt body.
You might be tempted (I was!) to finish-stitch the raw edge of the shoulder curve -- don't bother, this will be trimmed after seaming. When you see the finish on my pieces, don't feel like you forgot something.
 Step 12 - Stitch sleeve seam
This is a plain seam, bringing the sides of your sleeve (piece 5) together, and sew up the side as indicated in the diagram to the left. Press your sleeve seam open. You do not need a sleeve board, if the sides of the sleeve are creased as you open the seams up, it's not the end of the world.
Step 13 is for views A, B, and D (it's the sleeve hem).
Note: For these next steps, I have chosen to do Step 18 before Steps 14-17. I would recommend this only to guarantee that you get your sleeves in correctly before you do the labor-intensive slip-stitching, but there is no ease-of-use benefit (or detriment) to doing it this way.
 Step 14 -Turn in 5/8" (1.5cm) along unnotched edge of sleeve band (piece 9). Press. Trim pressed edge to 3/8" (1cm).
Now we're going to take our contrast color sleeve bands (piece 9) and lay it right-side down. Find the long edge that doesn't have the notch and fold it up ⅝" and press. Then, trim ¼" off the raw edge of the folded side (see diagram).
Step 15 - With right sides together, fold sleeve band along foldline. Stitch. Trim. Turn sleeve band right side out; press.
 This is basically straightfoward, fold the sleeve band more or less in half along the foldline. You will have a sort of long pocket with one side of the opening folded down and the other still flat. Stitch a regular ⅝" seam along each side, then trim that seam down so that the allowance is maybe ⅛-¼" -- be careful not to break your stitching. On the folded edge, go ahead and clip that corner down.
 |
| We've created a long "pocket" with a single folded-down side. We'll trim the seam down and clip the corner on the foldline, and then turn this right-side out and press. |
Step 16 - Pin sleeve band to lower edge of sleeve, matching symbols. Stitch, keeping pressed edge free. Turn seam toward sleeve band; press.
 This part might seem tricky but it's not too difficult. Taking the sleeve that you put together in Step 12 and find the notch on the opening edge. Overlay the cuff (sleeve band) around the edge of the sleeve, matching the notch on cuff to the notch on the sleeve. You want the folded side of the cuff to be facing up, and the raw edge of the cuff to match the raw edge of the sleeve. Then, pin into place (do not pin the folded part, just the raw edge). The edges of the cuff should meet at the seam of the sleeve. This step you will be working "under" the folded part for the most part, we don't want to touch that folded edge of the cuff.
Now, take the sleeve over to the sewing machine and stitch it into place, but just stitch the unfolded part to the sleeve -- don't stitch the folded edge of the cuff down, leave that free. We're going to use that to enclose the raw edge in the next step.
When you're done stitching, press your seam toward the cuff. Now, turn the sleeve down (away from the shoulder. You'll find that the seam wants to perfectly enclose within that folded edge.
\

You have to admit: that seam that joins the sleeve to the cuff is neat as hell, the way the fabric transitions without any visible stitching. We want to keep it that way, and close up that seam so that it finishes those raw edges and keeps them tucked away, but without creating an unsightly stitch line across our cuff. The way we do this is with the slipstitch. Put the raw edges of the seam from the previous step underneath the folded edge of the cuff so that they are enclosed, and then slip stitch through the raw edges and the fold to seal the cuff without peeking through to the outside of the garment. This will take a while, this is not a small task, I recommend settling in someplace comfy and taking your time with this. If you use your index finger to shift the outside layer of the sleeve cuff behind your needle, you will feel it pull off the end of your needle.
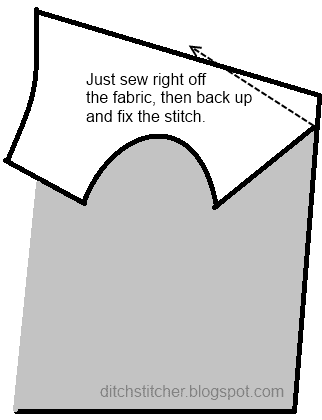
 Step 18 - With right sides together, pin sleeve into armhole, placing large circle at shoulder seam. Adjust ease; baste. Stitch. Stitch again 1/4" (6mm) away in seam allowance. Trim close to stitching. Press seam allowances flat. Turn seam toward sleeve.
I'm not going to lie to you: Putting a fitted sleeve in is tricky, but it's not impossible and if you're very careful and very patient, you'll probably do fine even on your first time. When I started this, I did a finish-stitch around the armhole one the shirt body, and the shoulder of the sleeve -- this was unnecessary, so don't bother doing that as you'll just trim it away and re-do the finishing stitch at the end of this step.
Turn your garment body inside out and turn your sleeves right-side out. Then fish the sleeve up through the bottom of the shirt toward the armhole. Start by matching the underarm seam on the sleeve to the underarm seam attaching the front to the back on the shirt body. Pin that into place provisionally, then start to lay the fabric up the side of the sleeve (Note: Put your pins in so that they point to the raw edge, you need to maximize your hold on this), and check that your notches match: If you've got a single notch matching to a double-notch, this sleeve belongs on the other shoulder. Otherwise, pin your notches into place (You want the pins to be on the outside of the garment--you might find it easier to place them on the inside, but once they're placed, switch them to the outside so you'll have access to them while you sew!), then the small dots, and then finally pin the large dot at the top of the shoulder to the shoulder seam on the garment. Use the easestitch to gather the sleeve fabric between the small dots so that it is flush with the garment body: You will want to do all "drastic" gathering on the exterior easestitch and then use the interior ease-stitch to create a smooth transition to the seamline, because you do not want any visible gathers on your shoulder's seamline. Get those gathers as smooth and even as possible, and then put a pin in (point toward the raw edge) at least every ½" and no more than 1" apart. If you put the pin in parallel to the seamline, when you go to take it out at the machine you will lose your form and have to start all over again! Once you've gotten the easestitch into place, throw a few more pins on either side of the notches (it doesn't need as much pinning as the easestitch, but you'll want to hold it into place).
Next, take it over to the sewing machine and very very slowly and carefully put that seam into place. You're going to need to use your fingers a lot in this step -- you want to feel for folds, creases, and extra layers of fabric. Between the easestitching and the curves on this section, the fabric is going to try very hard to misbehave, and you have to take it easy and make sure it doesn't! Once you're done with the first seam, check how it looks from the right side, if there are any folds, you can usually pop out a few stitches around the fold or pucker and "smooth it out" with a re-stitch.
Now that you've got the first seam in, it's time to do it again about a ¼" closer to the raw edge. Using the 3/8" guide (10mm) will line this up... this will be much easier but don't floor it, the raw edge and the garment will still want to fold under.
The next step is to trim the seam. Go ahead and give yourself about 1/8-1/4" from the outer seam.
At this point, it's a good idea to bind the raw edge, but I don't bother doing the raw edges separately since this seam isn't meant to be pressed open, I just overlock over both layers of the allowance to keep the seams from fraying. Finally, I press the allowance toward the sleeve and away from the body of the shirt.
Phew! Fitted sleeves are done... and lookin' fierce!
 Step 19 - Turn up 1 1/4" (3.2cm) hem. Baste close to fold. Trim hem to an even width. Finish raw edge. Sew hem in place, easing in fullness if necessary. Baste raw edges together, press.
We know how to hem by now. The only difference here is that we have this little split opening at the sides of the shirt, which actually makes the hemming easier, because you're just hemming a straight line across the bottom of the front and back.
Step 20 - Make a 5/8" (1.5cm) Narrow hem at side opening edge, tapering to nothing above large circle. Privot across seam allowance 1/4"(6mm) above large circle, when stitching.
This is where we take our hem up that split in the side, it's pretty simple, the hem length will naturally want to decrease as you get toward that dot, so let it do it's thing. Despite the fact that the pivot will not see a lot of wear, I still find that it's not a bad idea to reinforce the stitching when you turn around at the dot.
With this, your shirt is basically done, you just need to apply the trim to the neckline.
Step 21 is for View A
Step 22 - Pin trim to front neck edge, turning under 1/4" (6mm) on ends at shoulder seams, as shown. Stitch close to long edges. Slipstitch ends.

So it turns out that a 2" trim I got is simply too wide and inflexible to ease around the scooped neck of the collar. I started by pinning my trim into place and found that I was getting weird pleats and gathers underneath, so I've had to set aside this particular ribbon and redouble my efforts. The tricky thing is finding something that will match both the royal blue of the shirt, but also the light gray of the cuffs. Finding a single-sided lace is probably not a bad idea. I ended up getting this weird little lace trim at Albert Zoll while I was in Philadelphia. It's a little more flashy than I usually like in a collar, but I'm going to see if I can't make this work. Because this isn't a solid ribbon, I can't do what the instructions say: If I were to simply stitch along the neckline, it would look weird. So instead, I sat down on the patio with a cup of tea and a needle and I hand-tacked the lace into place every half inch or so, top and bottom. In either instance, it's sort of nice to be able to tack down the collar so that it won't roll open. I still turned under at the shoulder seams and stitched that into place just to keep the edges from raveling.
 |
| The circles are where I hand-tacked the trim to the collar. |
This is our usual "last step".
That's it, you're done! Go try on your new shirt!


custom embroidery digitizing
ReplyDeletehttps://crystaldigitizing.com/custom-embroidery-digitizing/